Encryption: SSL certificates facilitate public-private key pairing, making SSL/TLS encryption possible. Clients (like web browsers) get the public key necessary to open a TLS connection from a server’s SSL certificate.
Authentication: SSL certificates verify that a client is communicating with the correct server that owns the domain. This helps prevent domain spoofing and other types of attacks.
HTTPS: An SSL certificate is necessary for an HTTPS web address. HTTPS is the secure form of HTTP, and HTTPS websites are websites that have their traffic encrypted by SSL/TLS.
Certificate Information: SSL certificates include information like the domain name for which the certificate was issued, the person, organization, or device it was issued to, the certificate authority that issued it, associated subdomains, issue date, expiration date, and the public key.
Trust: The most important part of an SSL certificate is that it is digitally signed by a trusted Certificate Authority (CA). Browsers trust certificates that come from an organization on their list of trusted CAs.
In essence, an SSL certificate is essential for maintaining the security and trustworthiness of a website. It ensures that user data remains secure, verifies the ownership of the website, prevents attackers from creating a fake version of the site, and gains user trust.
Tutorial About How to enable force http to HTTPS ?
An SSL certificate is included in the Beginner plan and higher and will be issued and activated for domains using your site’s name servers. This means that besides HTTP, HTTPS will also work for your site with us.
In this tutorial, we show you how to automatically redirect your HTTP website to HTTPS, ensuring that your website visitors always use HTTPS using htaccess file.
Step 1 – Go to File Manager in the Control Panel
Step 2 – Create an .htaccess file
Step 3 – Edit the .htaccess file
Step 4 – Paste in the configuration
Paste the configuration below in the text editor and click Save at the top of the screen.
#Rewrite everything to https
RewriteEngine On
RewriteCond %{HTTPS} !=on
RewriteRule ^(.*)$ https://%{HTTP_HOST}%{REQUEST_URI} [L,R=301]
Now, reload your website, voila your site loading with secure https. Thank me later. 
Check this link for all blogging tips and tricks: https://hardik.com.np/category/blogging/
]]>Why is it better to manually install Facebook Comments rather than use a plugin?
Here are just a few reasons:
- Plugins tend to have unnecessary code in addition to serving their core functions, which may slow down your site. Especially if you have a lot of WordPress plugins installed already. It’s always best to limit the amount of plugins you have, when you can.
- It’s more secure. Plugins, especially non-updated plugins, are prone to hacker attacks and malware injection. Which can cause nightmares for your site if not protected properly.
- And lastly, it’s not that hard. As you’ll discover below, the whole process only takes a few minutes to complete.
Step 1: Initial Setup of Facebook Comments
The first step is to visit the official Facebook Comments Plugin developer page and setup your comments settings. While you don’t need to generate the code from this page as we provide it all below, it’s good to test it out and get a feel for what it will look like on your website.
Once you’re done testing… go to Appearance > Editor inside your WordPress backend.
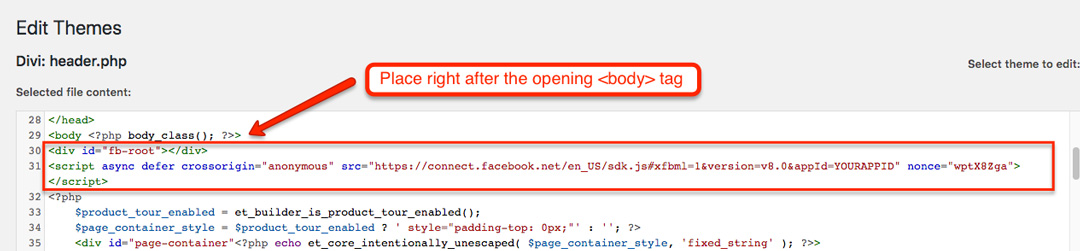
Place the code below right after the opening <body> tag (usually located in the header.php file).
Without Facebook APP ID
<div id="fb-root"></div>
<script async defer crossorigin="anonymous" src="https://connect.facebook.net/en_US/sdk.js#xfbml=1&version=v12.0" nonce="vtHh10Cd"></script>
With Facebook APP ID
Use this code (with FB App ID) if you plan to moderate comments.
<div id="fb-root"></div>
<script async defer crossorigin="anonymous" src="https://connect.facebook.net/en_US/sdk.js#xfbml=1&version=v12.0&appId=YOURAPPID" nonce="vtHh10Cd"></script>
It’s also recommended by Facebook to add the following meta tag in the <head>
section:
<meta property="fb:app_id" content="YOURAPPID" />To view the full list of tags and display options, visit the Facebook Comments settings section.
Example of header.php code
Step 2: Installing Facebook Comments Code
Place the code below where you would like the Facebook Comments to show up on your website.
Unlike the code given to you from the official Facebook Comments site, the code below utilizes dynamic URL functions within WordPress to make the FB Comments code unique for each page of your website.
Most themes use a file named single.php to manage the blog post section.
<div class="fb-comments" data-href="<?php the_permalink(); ?>" data-width="100%" data-numposts="10" data-order-by="social" data-colorscheme="light"></div>
Here’s an example of what the code could look like when you add it to WordPress:

Example of FB Comments Code Placement in WordPress
Facebook Comments Settings
- For dynamic URLs, edit the data-href section to include <?php the_permalink(); ?>
- To enable lazy loading, add the boolean data-lazy attribute and set to “true” (default is “false” and not listed)
- For mobile and/or responsive comments, change data-width to a percentage such as 100% to make it have a fluid/responsive width and/or use the boolean attribute data-mobile to use the mobile-optimized version of FB Comments when detected (auto-detected).
- Use data-numposts to control the amount of comments that show up per comments page.
- The order of comments can either be displayed by social signals “social” (default), also known as “top“, or by the latest date/time it was given (“time“, “reverse_time“) through the data-order-by tag.
- Edit the color theme through the data-colorscheme tag. Make it either light (default) or dark.
Changing the Language
If you’d like to change the default language of your Facebook Comments just update the src value from en_US (English, United States) to whichever language and locale you’d prefer.
src="https://connect.facebook.net/es_MX/sdk.js#xfbml=1"This would change the default language to Spanish and the country to Mexico.
Facebook supports many ISO languages and country codes. Learn more about Facebook localization.
Step 3: Test and Verify
Once you are finished placing the two snippets of code on your site, visit a few of your blog posts to verify that the Facebook Comments are functioning and displaying properly.
Each page/post should have its own unique set of comments and be generating them automatically.
The final product should look something like this:
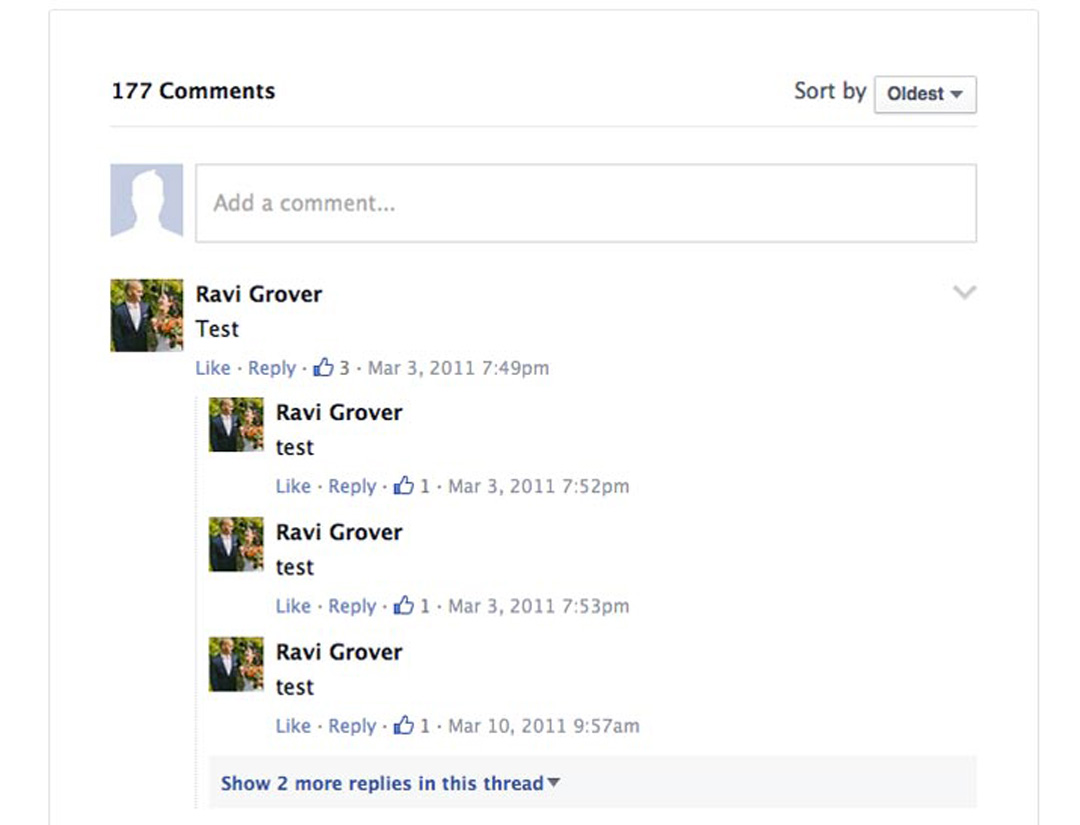
Example of Facebook Comments working properly
That’s it!
I hope this post was helpful for you in installing Facebook Comments on your WordPress website.
Best Reseller for Webhosting is know as RESELLER CLUB
Click Blue ResellerClub Image Above to Get best Discounts From Reseller Club.
]]>YouTube Channel Art Template
YouTube Channel Art or YouTube Banner size are regularly changing by years. So it’s confusing all how to upload your one. That’s why we came here to make your task easier.

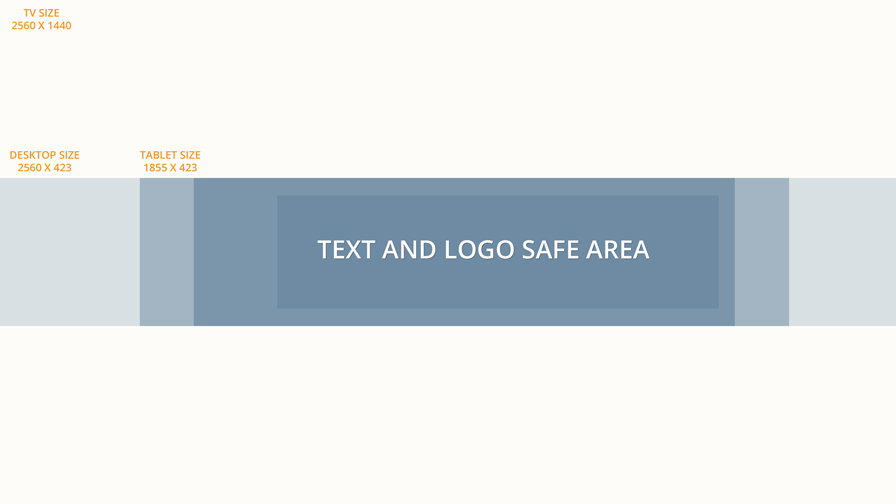
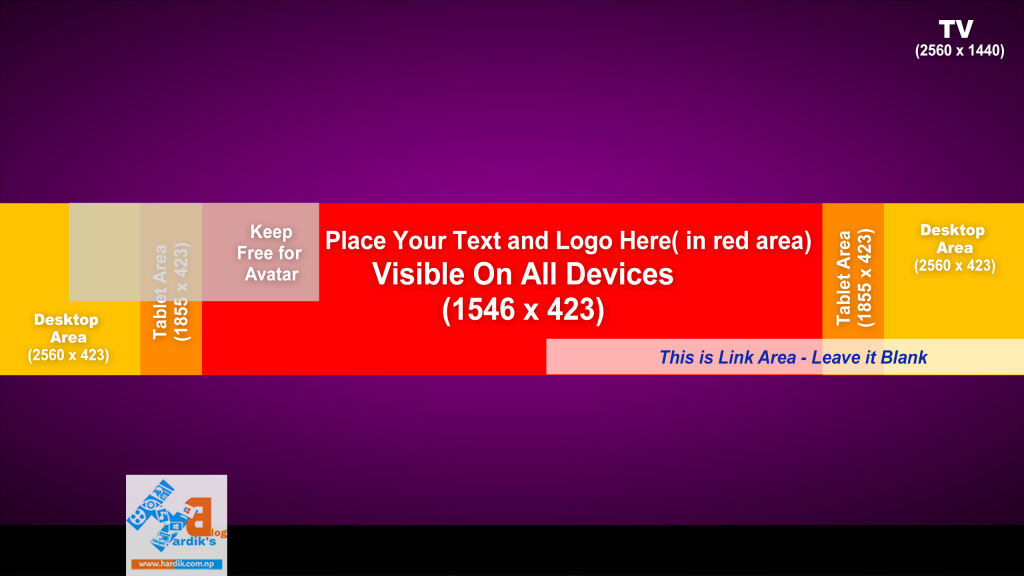
In short the maxium size for Channel Art of YouTube is 2560px x 1440px and the minimum is 1488px*423px. Here we will provide you the free youtube channel art template psd for Photoshop which you can easily edit and change your content as per as your need.
Before Start let me show the template sample image below.
How to make effective Channel Art for YouTube?
If you wish all your YouTube channel art content must visible across any device then you have to place all of your content inside TEXT AND LOGO SAFE AREA shown in the image above. Therefore if you are targeting only a type of device then you have to choose respective size shown for TV, Desktop and Tablets.
1. Canva YouTube Channel Art Template
This template comes for canva user who use Canva to edit their blog post image, social media image and youtube channel art image and youtube custom thumbnail image. You can go through this template and edit as you want and download for free.
https://www.canva.com/design/DACVSr_X6ss/view
2. Photoshop YouTube Channel art Template PSD Download
This template comes for those who mostly use Photoshop for any image editing like for blog post featured image,youtube channel art image and so on. Download the Photoshop psd template file from the button below.
Download YouTube Banner Template Click on Button Below.

Click here for detailed YouTube channel art size.
Please Like, Share, Comment and Subscribe us for free updates.
]]>
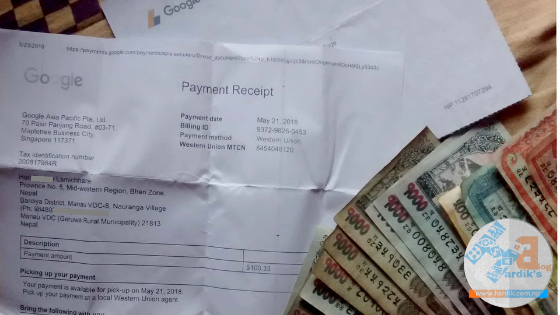
To earn money online in nepal using google adsense is the task of mind. Being frank if you want to be success in google adsense you must do smart work rather hard work. And saying this i doestn’t mean that you can do it through a nightover. Rather it needs deep dedication, determination, regulation, calmness, some small amount of money (obiviously :D) and some genuine hard work.
So lets start how to work smart for google adsense in Nepal.
Before Starting the topic lest’s have this Prof Image Of My Payment.
Must Popular Post: How to Submit Loksewa Aayog form using Mobile
Youtube Video About Loksewa Aayog online form with 80K view.
Read more…
]]>